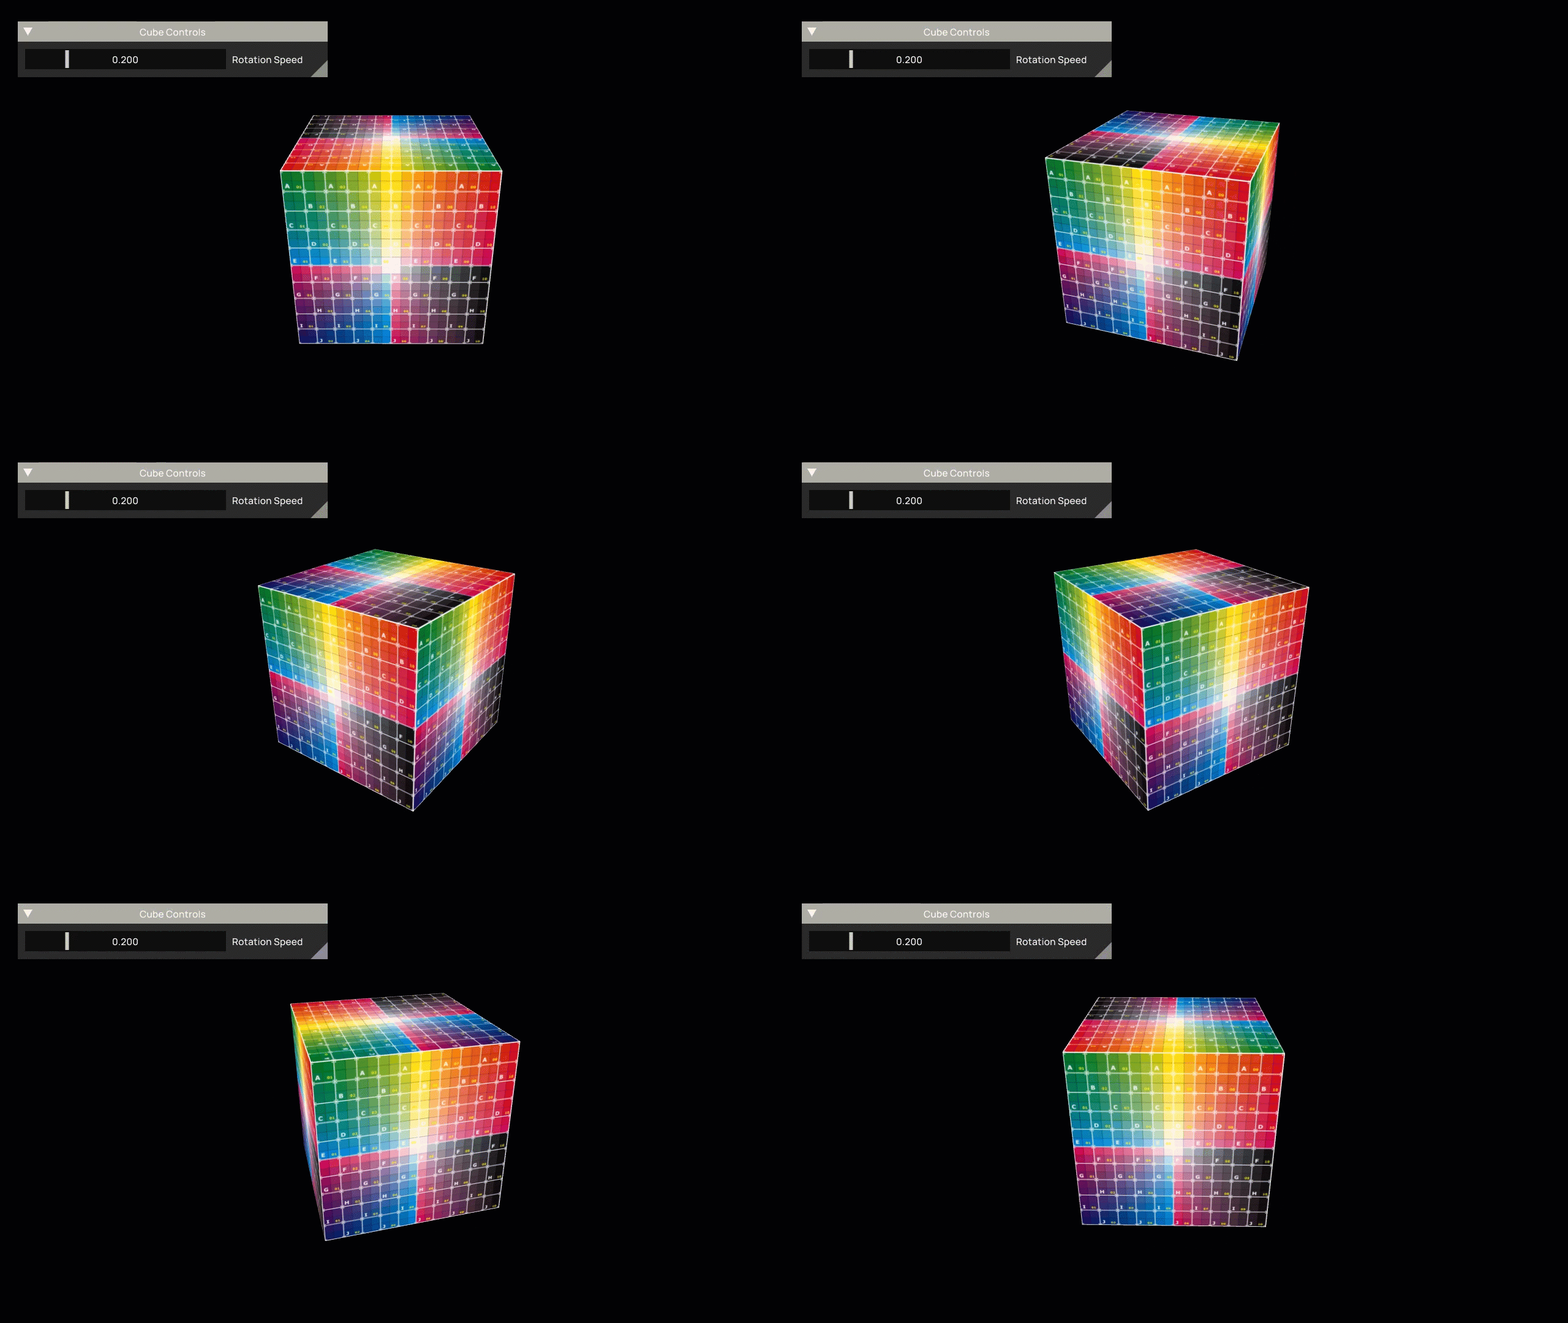
In this tutorial we're going to create a new NAP application that renders a textured cube to a window. The rotation speed of the cube can be controlled with a slider. Instruction videos are provided to guide you through the individual stages. Upon completion you will have a better understanding of working with NAP, hopefully something clicks! It takes about 45 minutes to complete. Open the rotatingtexcube demo for inspiration if you get stuck.
This tutorial assumes you are working from a pre-compiled distributable NAP package. However, some people prefer working with NAP directly from source. Fortunately most instructions in this document are the same for both contexts, except some paths. Additional information is provided when this is the case.
Use a terminal to navigate to the tools directory inside the NAP root directory. Run the create_app script with rotatingcube as the first argument, the name of your application:
After creation your new application is located at apps/rotatingcube. This directory contains your source-code, assets, solution and build instructions. The app.json file in the root of the directory defines various project specific settings, such as: the name of your app , which modules to include and which content to load:
The most important module here is naprotatingcube. This is your application module, located inside the apps/rotatingcube/module directory. This directory contains the source-code of resources and components that are specific to your project.
Read the Project Management documentation to learn more about managing NAP applications and modules.
Navigate to apps/rotatingcube and run the build script to compile the application:
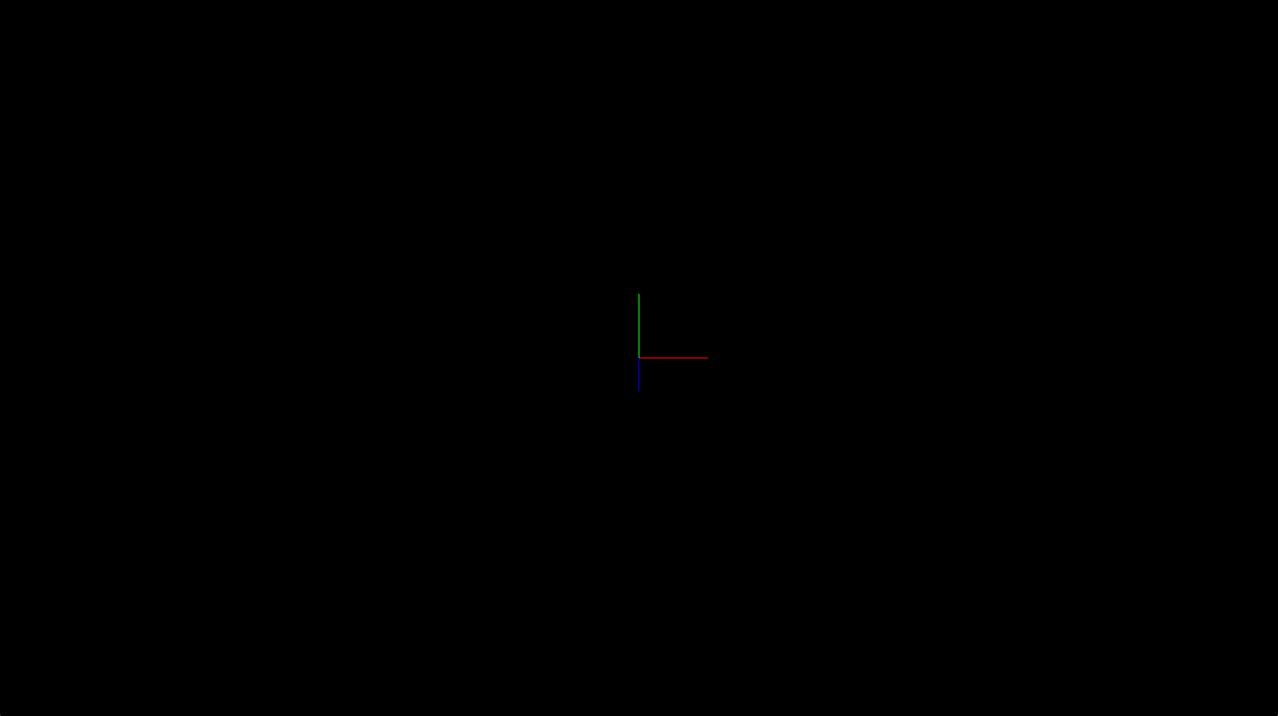
The app is compiled to the bin directory of your app. Navigate to the bin/Release-* folder and launch the rotatingcube executable in that directory. You should see the following window:
Note that when working from source the app is compiled to the bin directory in the nap root, not the application root
We're going to use Napkin to edit the application content.
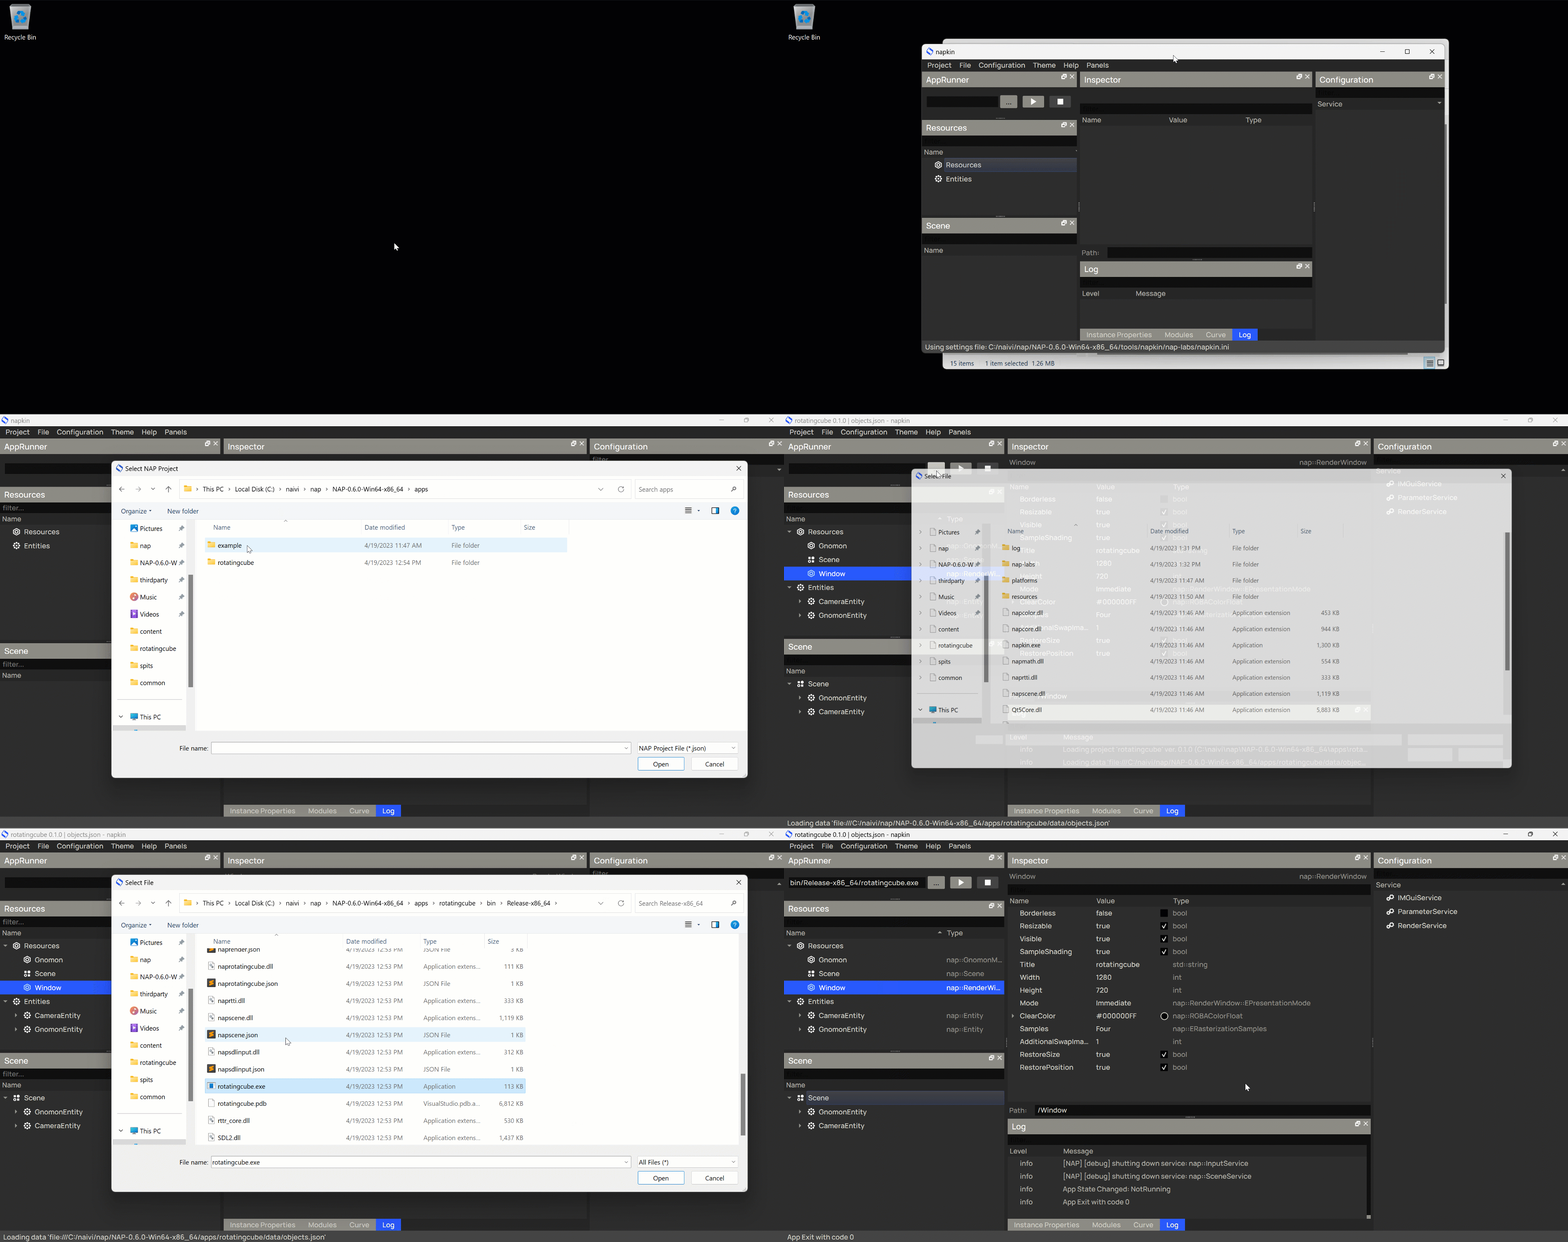
From the NAP root directory browse to the tools/napkin and launch the napkin executable.
Note that when working from source you must compile Napkin first. The compiled Napkin binary can be found in the bin/Release-*/napkin directory.
Project > Open...apps/rotatingcubeapp.jsonThe app.json points to an external file that holds the content of your application. By default, application content is stored in data/objects.json (relative to the application root). You use Napkin to author this content.
All externally sourced assets (such as images, audio, video, shaders etc.) that your content references must be placed in the data directory of your application, in this case apps/rotatingcube/data.
If Napkin fails to load the project make sure to build the application (in Release mode) at least once before loading it. This ensures that the custom application module naprotatingcube is compiled for you. The editor can then load and inspect it. All other modules (render, audio etc.) are pre-compiled and should work out of the box.
The AppRunner allows you to start / stop the application you are working on. This is very useful when you are editing application content and frequently have to re-launch the application. Click on the play button in the app runner panel to launch the app.
Let's begin by adding the resources that define, when combined, a textured cube in NAP.
Start by creating a uniform box mesh at the center of the scene.
In the resources panel:
Resources itemCreate Resourcenap::BoxMeshCubeMesh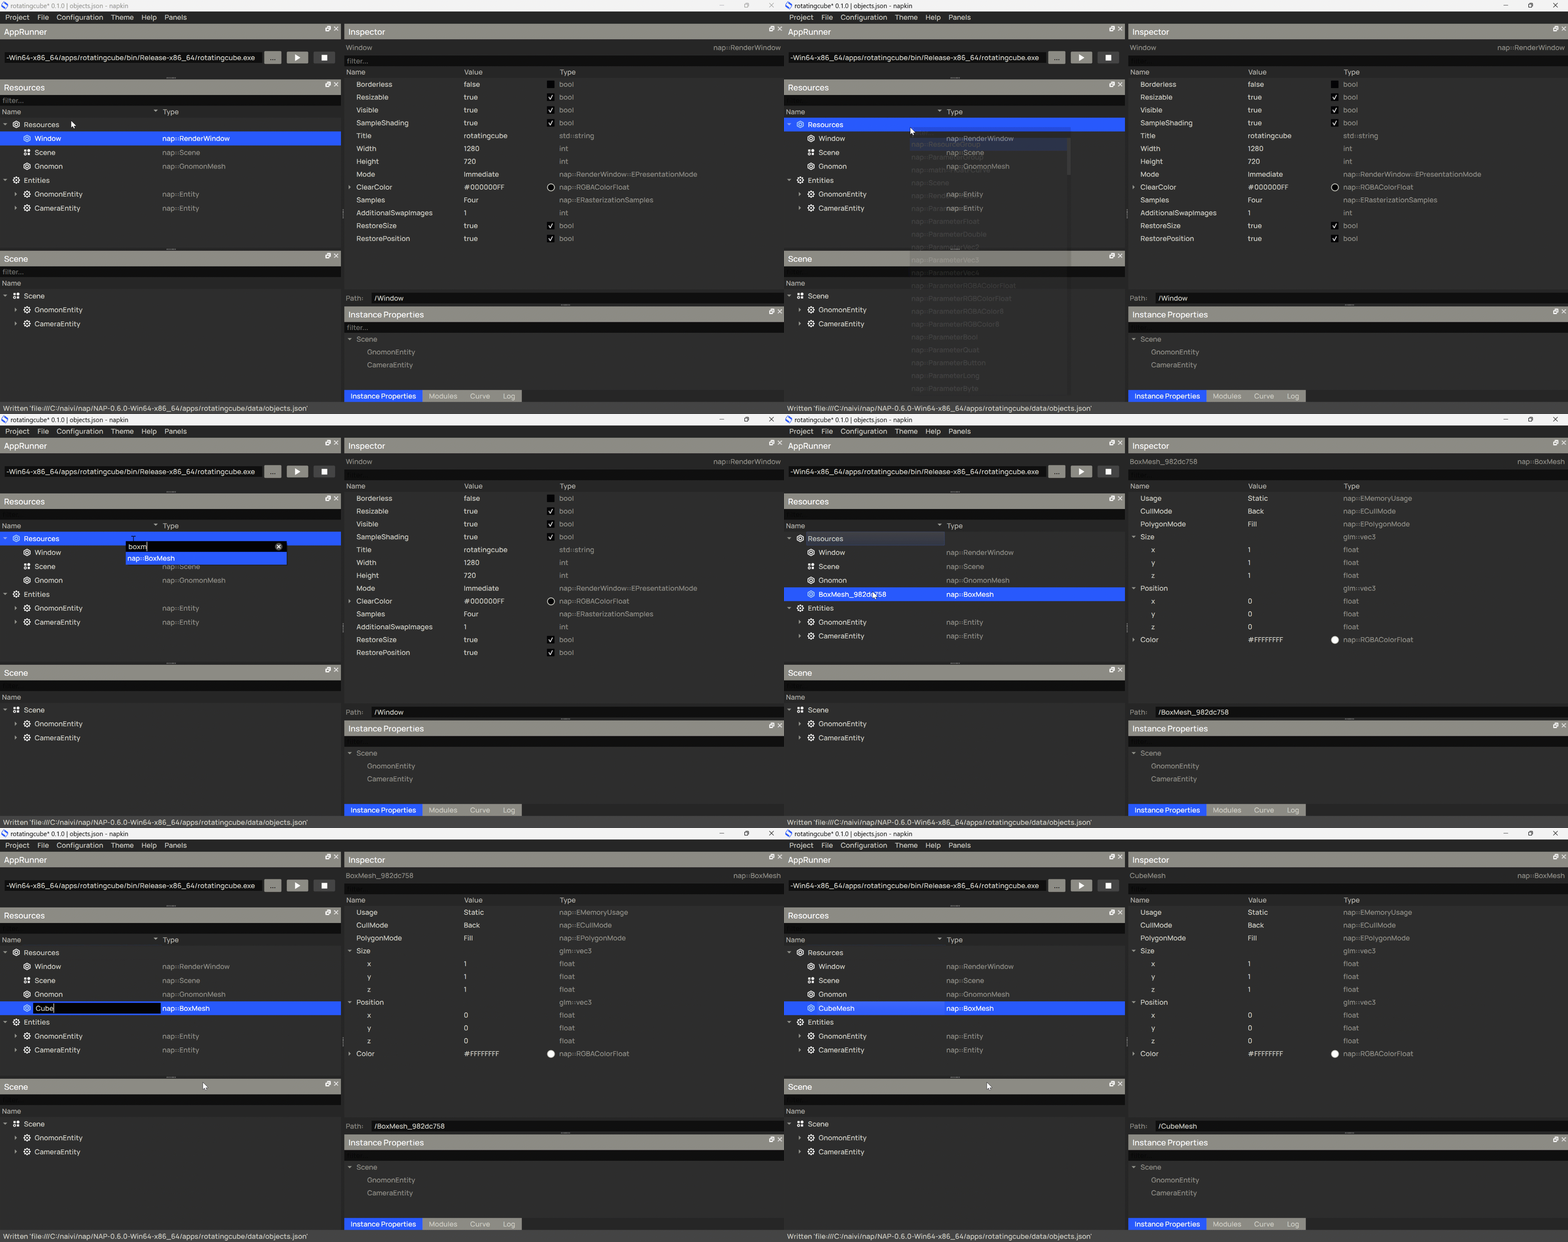
Let's add the image that we want to apply as a texture. Following the steps above: create a nap::ImageFromFile resource and rename it to CubeTexture.
If we now save the file and start the application it will fail to initialize because the CubeTexture doesn't point to a valid image on disk. We must provide it with one.
Download cube_texture.jpg and move it to apps/rotatingcube/data.
Select the CubeTexture in the resources panel. Link in the image by clicking on the folder icon next to ImagePath in the inspector panel. Browse to the texture in the data directory and select it.
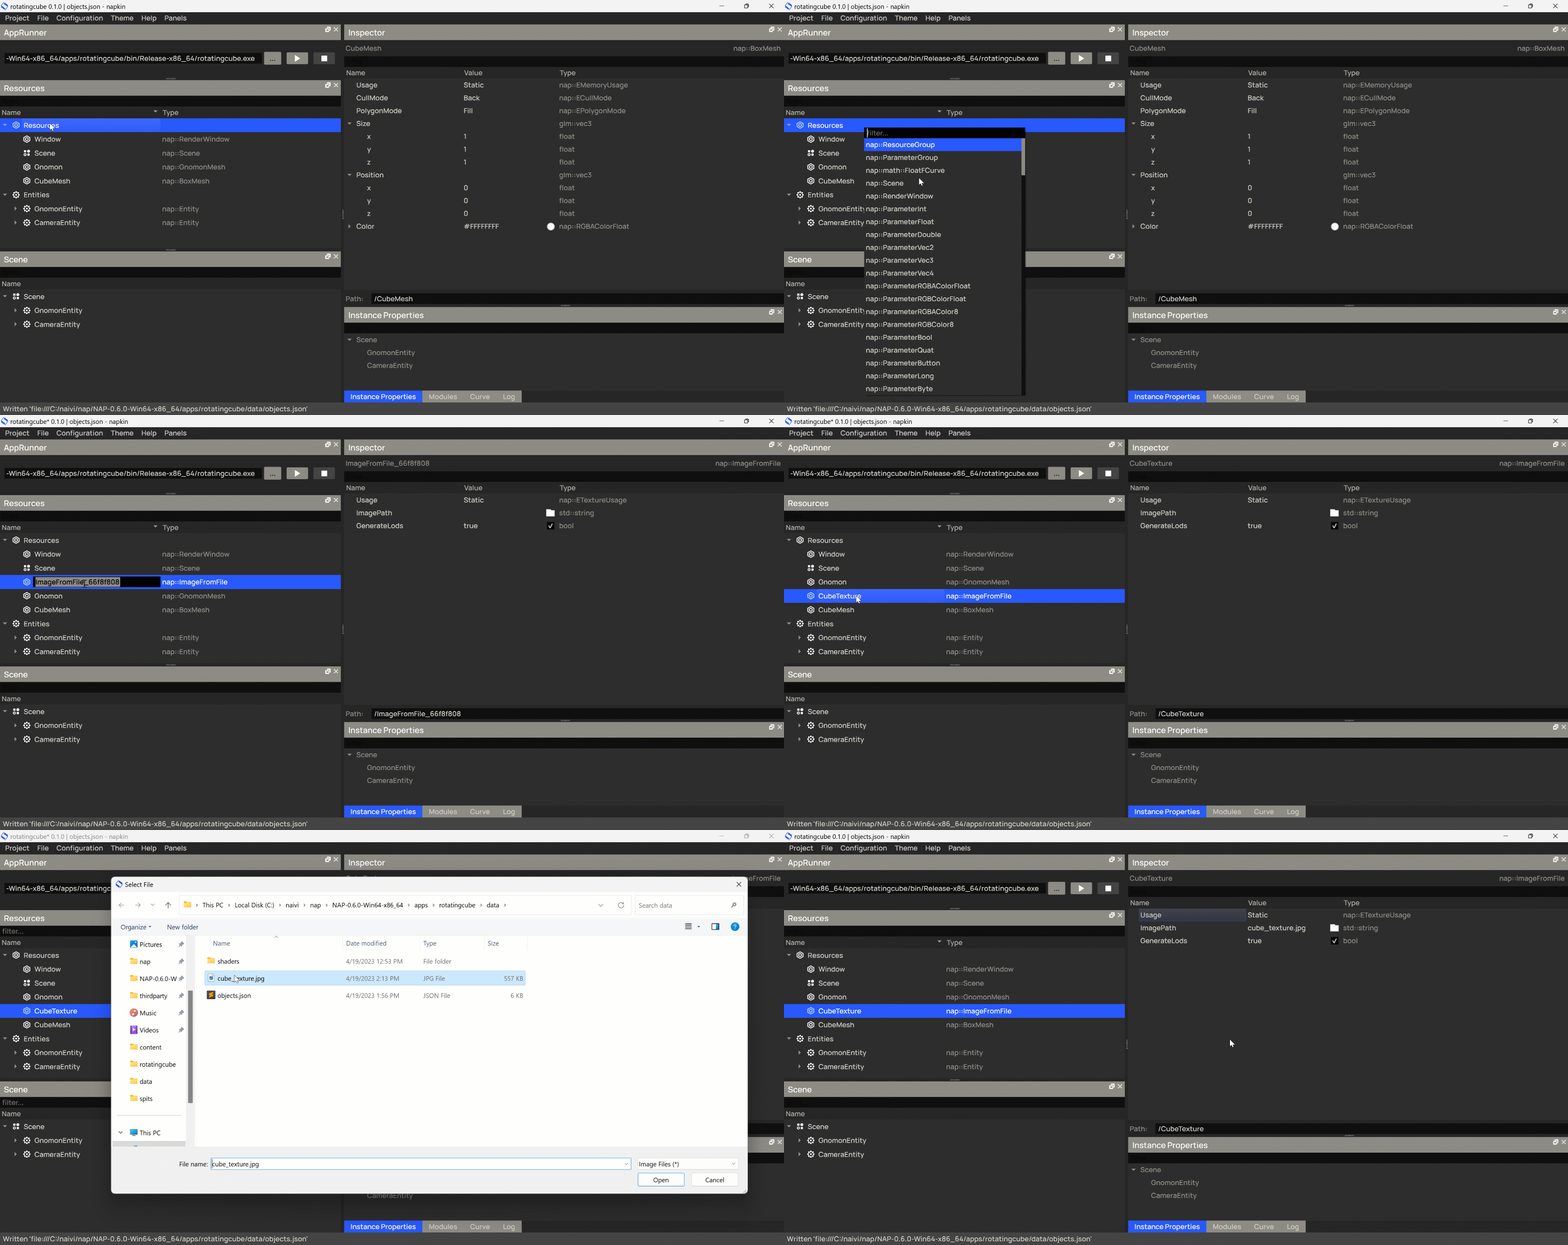
Next we create a shader program that we use to render the cube. Create a nap::ShaderFromFile resource and rename it to CubeShader.
Download the cube.vert and cube.frag shader files and move them to apps/rotatingcube/data/shaders.
Select the CubeShader in the resources panel. In the inspector panel click on the folder icon next to VertShader and select the cube.vert shader file. Continue by clicking on the folder icon next to Fragshader and select the cube.frag shader file.
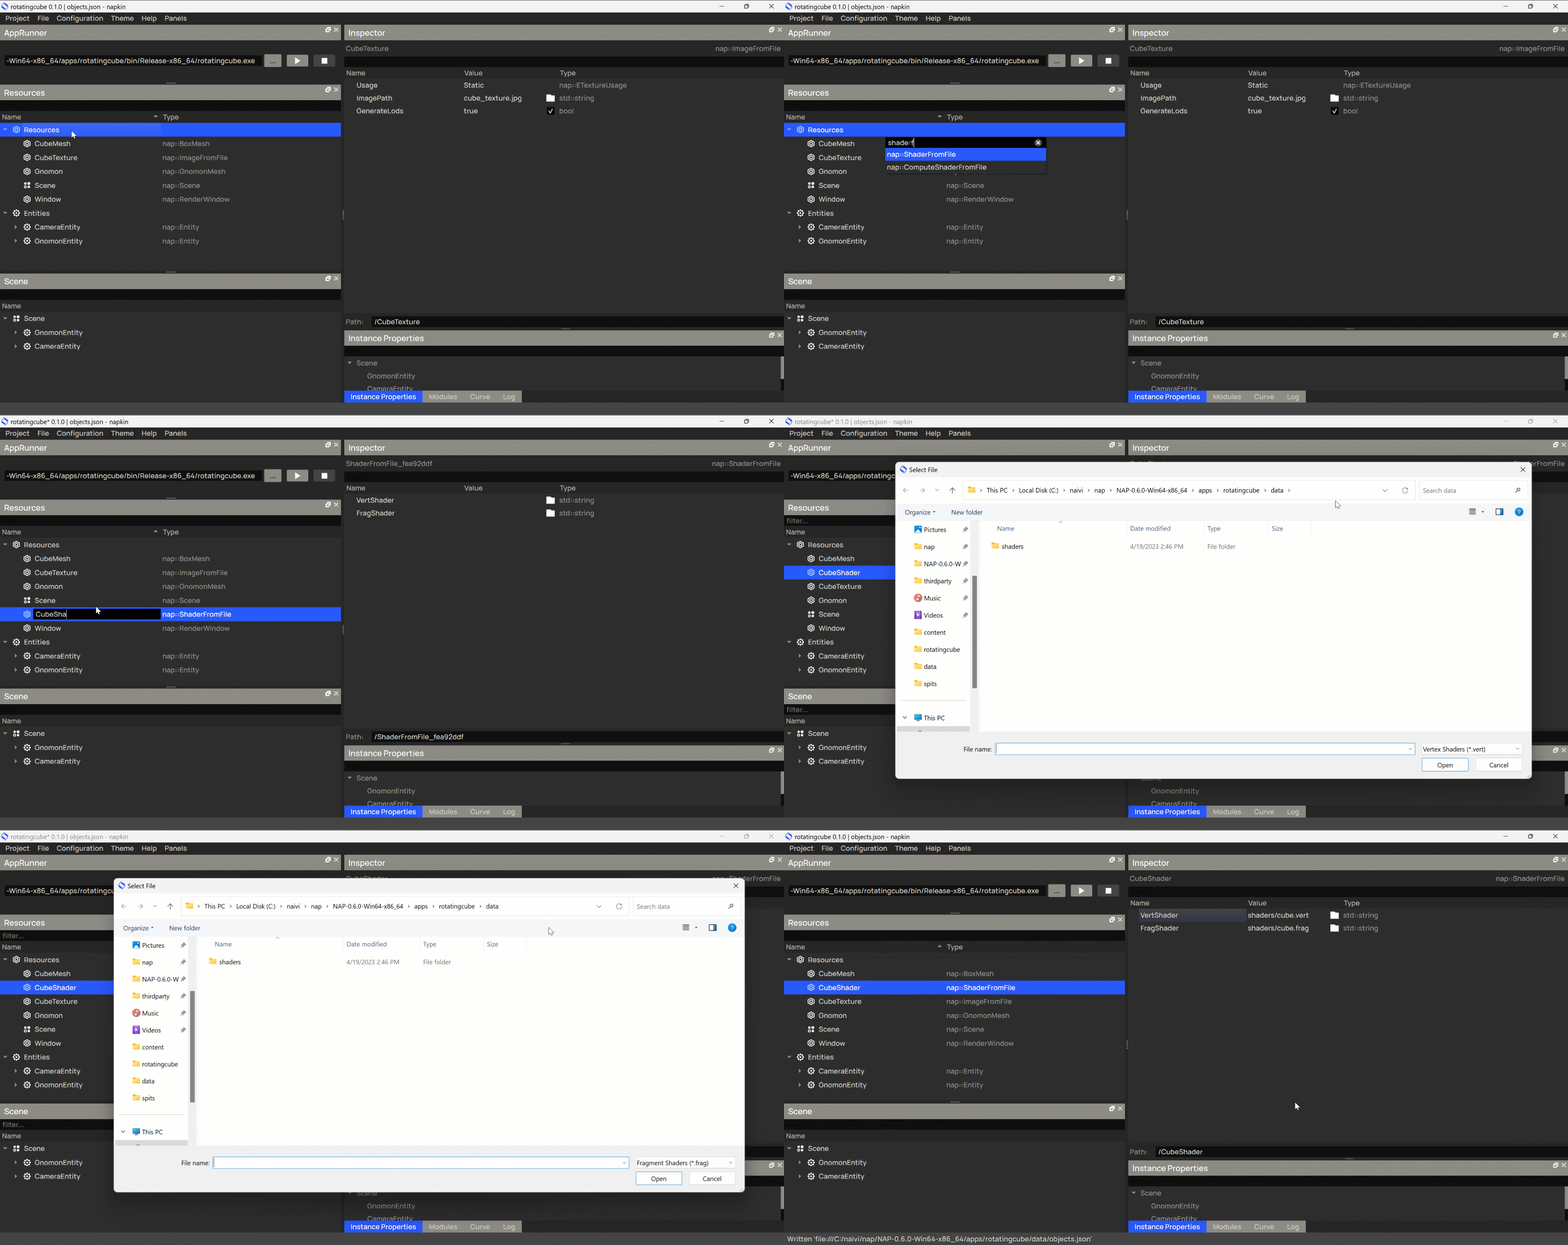
Let's add a material, so we can bind a texture to the shader and give it a color. Create a nap::Material resource, rename it to CubeMaterial and select it.
In the inspector panel click on the icon next to Shader and select the CubeShader in the popup.
Right-click on Uniforms in the inspector panel and add a nap::UniformStruct to it. From the popup menu, choose UBO, then navigate to the color uniform that was added. Set its value to 1 1 1. By doing this, you have set the default color of the cube to white by creating a binding in the material that targets the UBO.color uniform in the shader:
Right-click on Samplers in the inspector panel and add a nap::Sampler2D to it. From the popup menu, choose inTexture and expand the newly inserted item. Now click on the icon next to Texture and select the CubeTexture in the popup. By doing this, you set the default texture of the cube to CubeTexture by creating a binding in the material that targets the inTexture sampler in the shader.
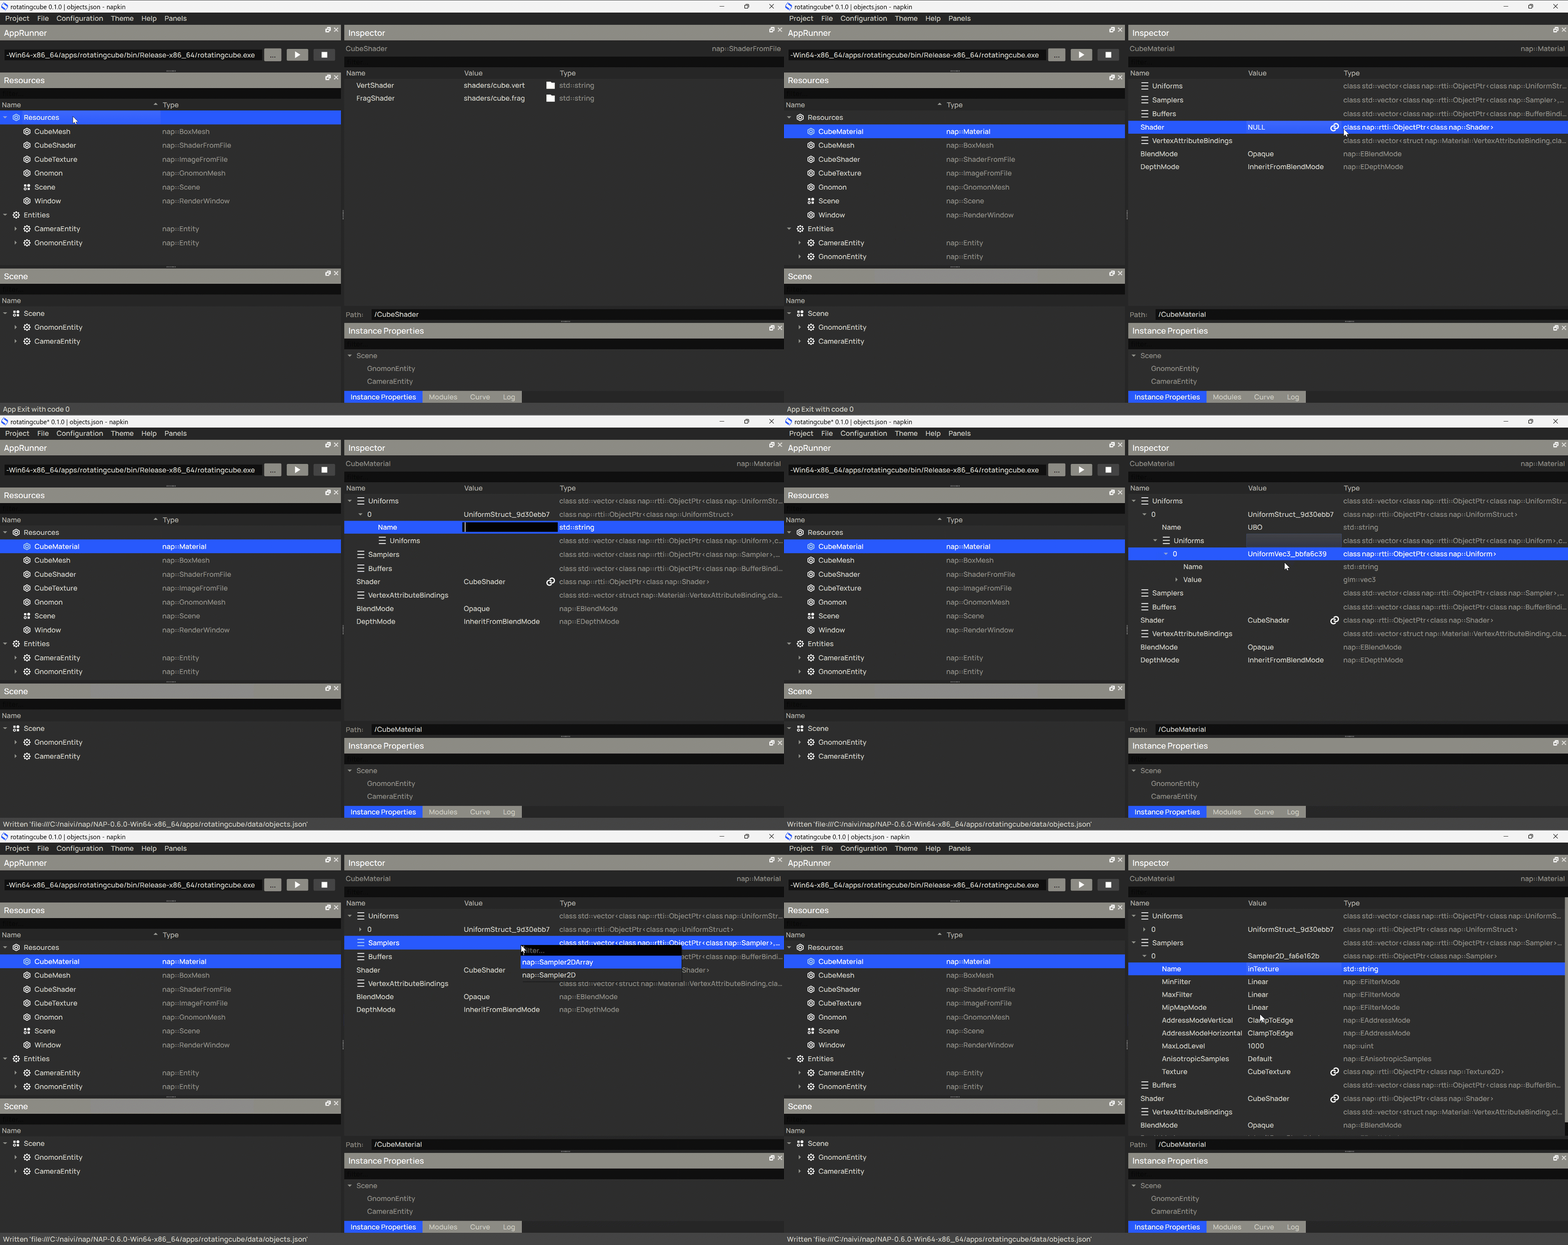
Continue by adding an entity that renders the cube to screen.
In the resources panel:
Entities itemCreate EntityCubeEntity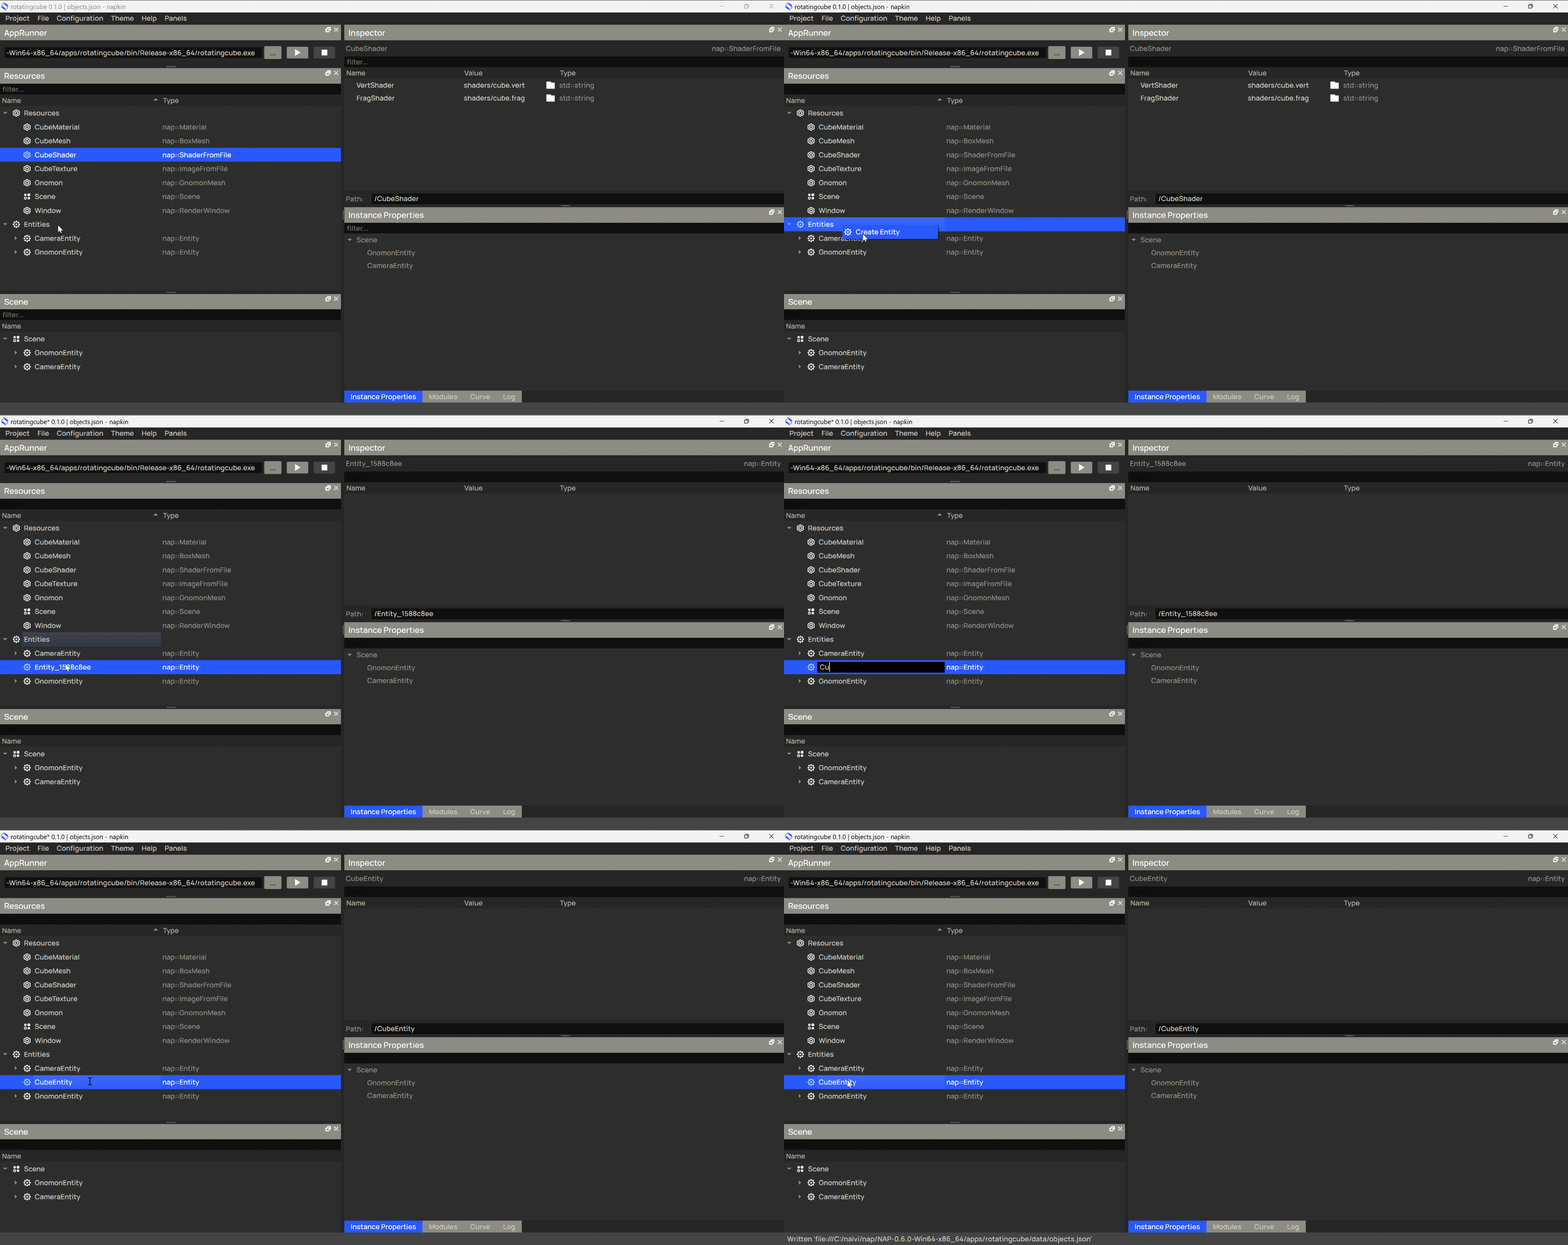
The CubeEntity needs 3 components: Transformcomponent to position it, a RotateComponent to rotate it and a RenderableMeshComponent to render it.
In the resources panel:
CubeEntityAdd Component...nap::TransformComponentCubeTransformComponentRepeat these steps for the nap::RotateComponent and nap::RenderableMeshComponent. Rename them to CubeRotateComponent and CubeRenderComponent.
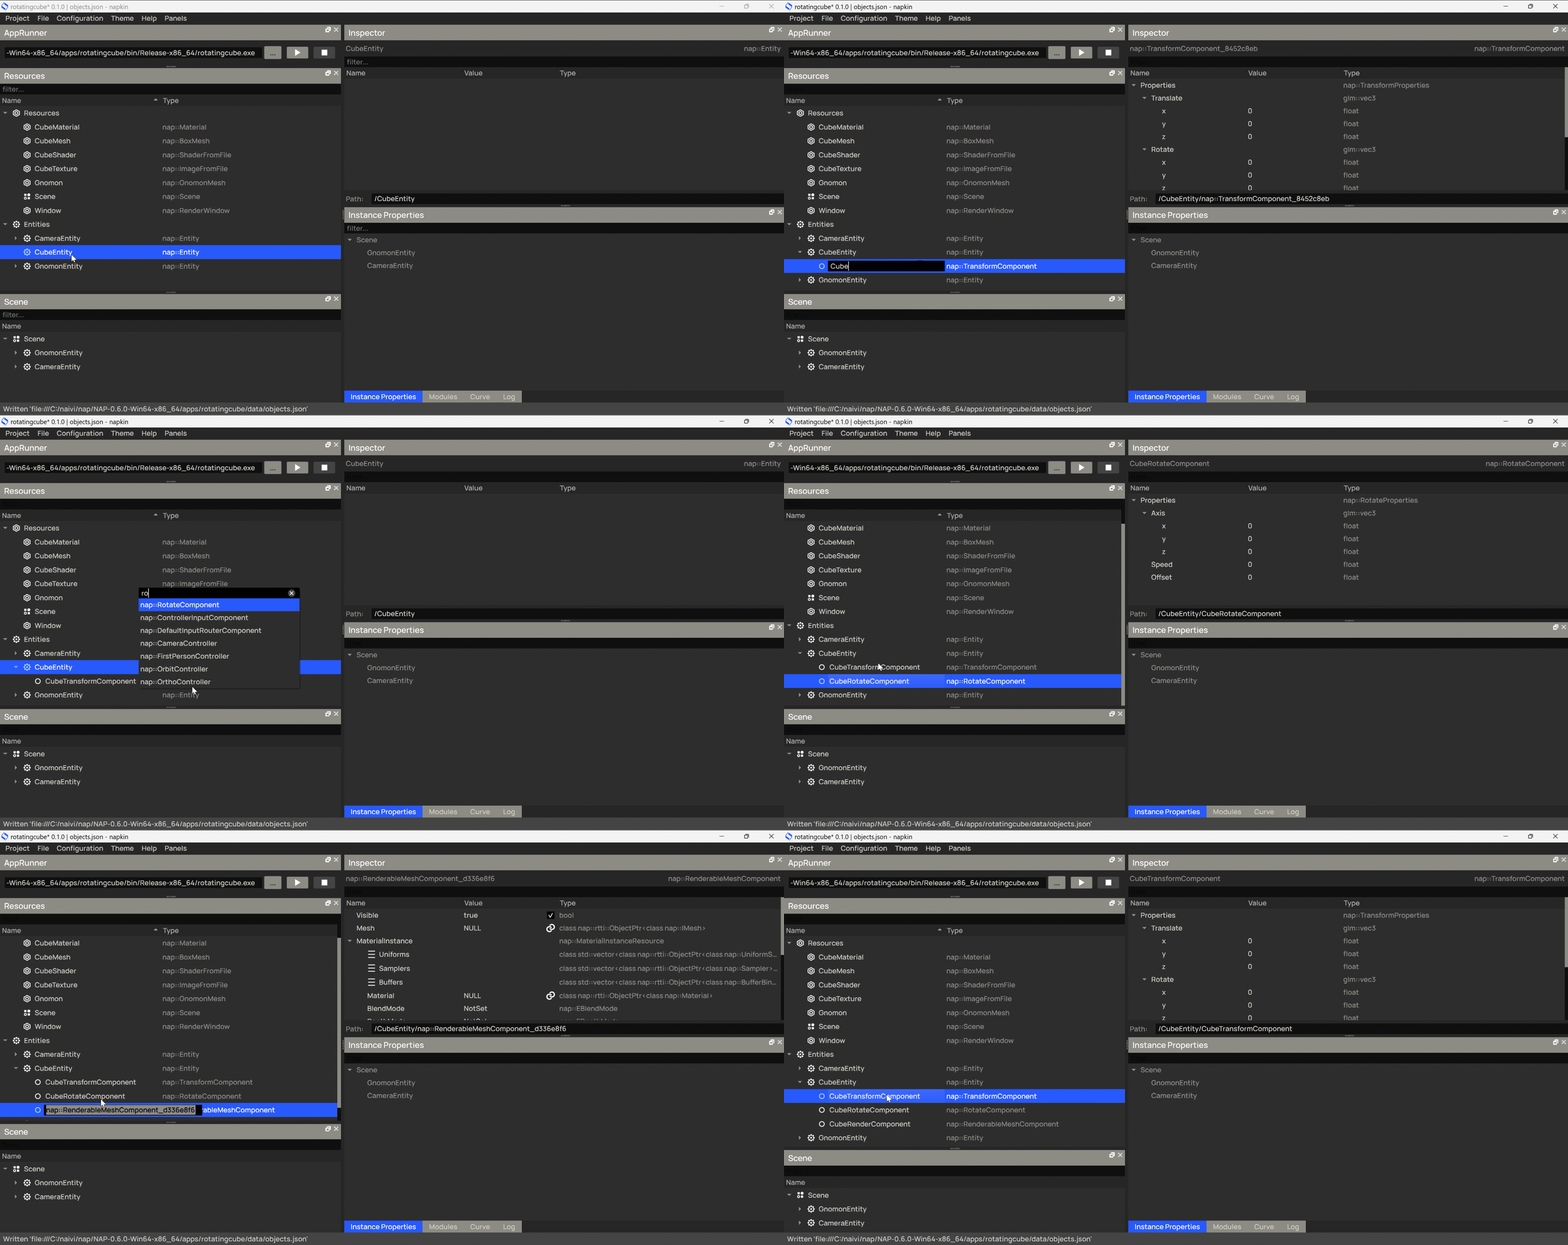
Select the CubeTransformComponent in the resources panel and change the UniformScale in the inspector panel to 4.0. This makes the box 4 times as large.
Select the CubeRotateComponent in the resources panel. Expand the Axis property in the inspector panel and change it to 0 1 0. Next change the Speed to 0.1. This tells the component to rotate the cube 360 degrees over the Y-axis in 10 seconds.
We need to tell the component which mesh to render using what material.
Select the CubeRenderComponent. In the inspector panel click on the icon next to Mesh and select the CubeMesh in the popup. Continue by expanding the MaterialInstance item. Click on the icon next to Material and select the CubeMaterial in the popup.
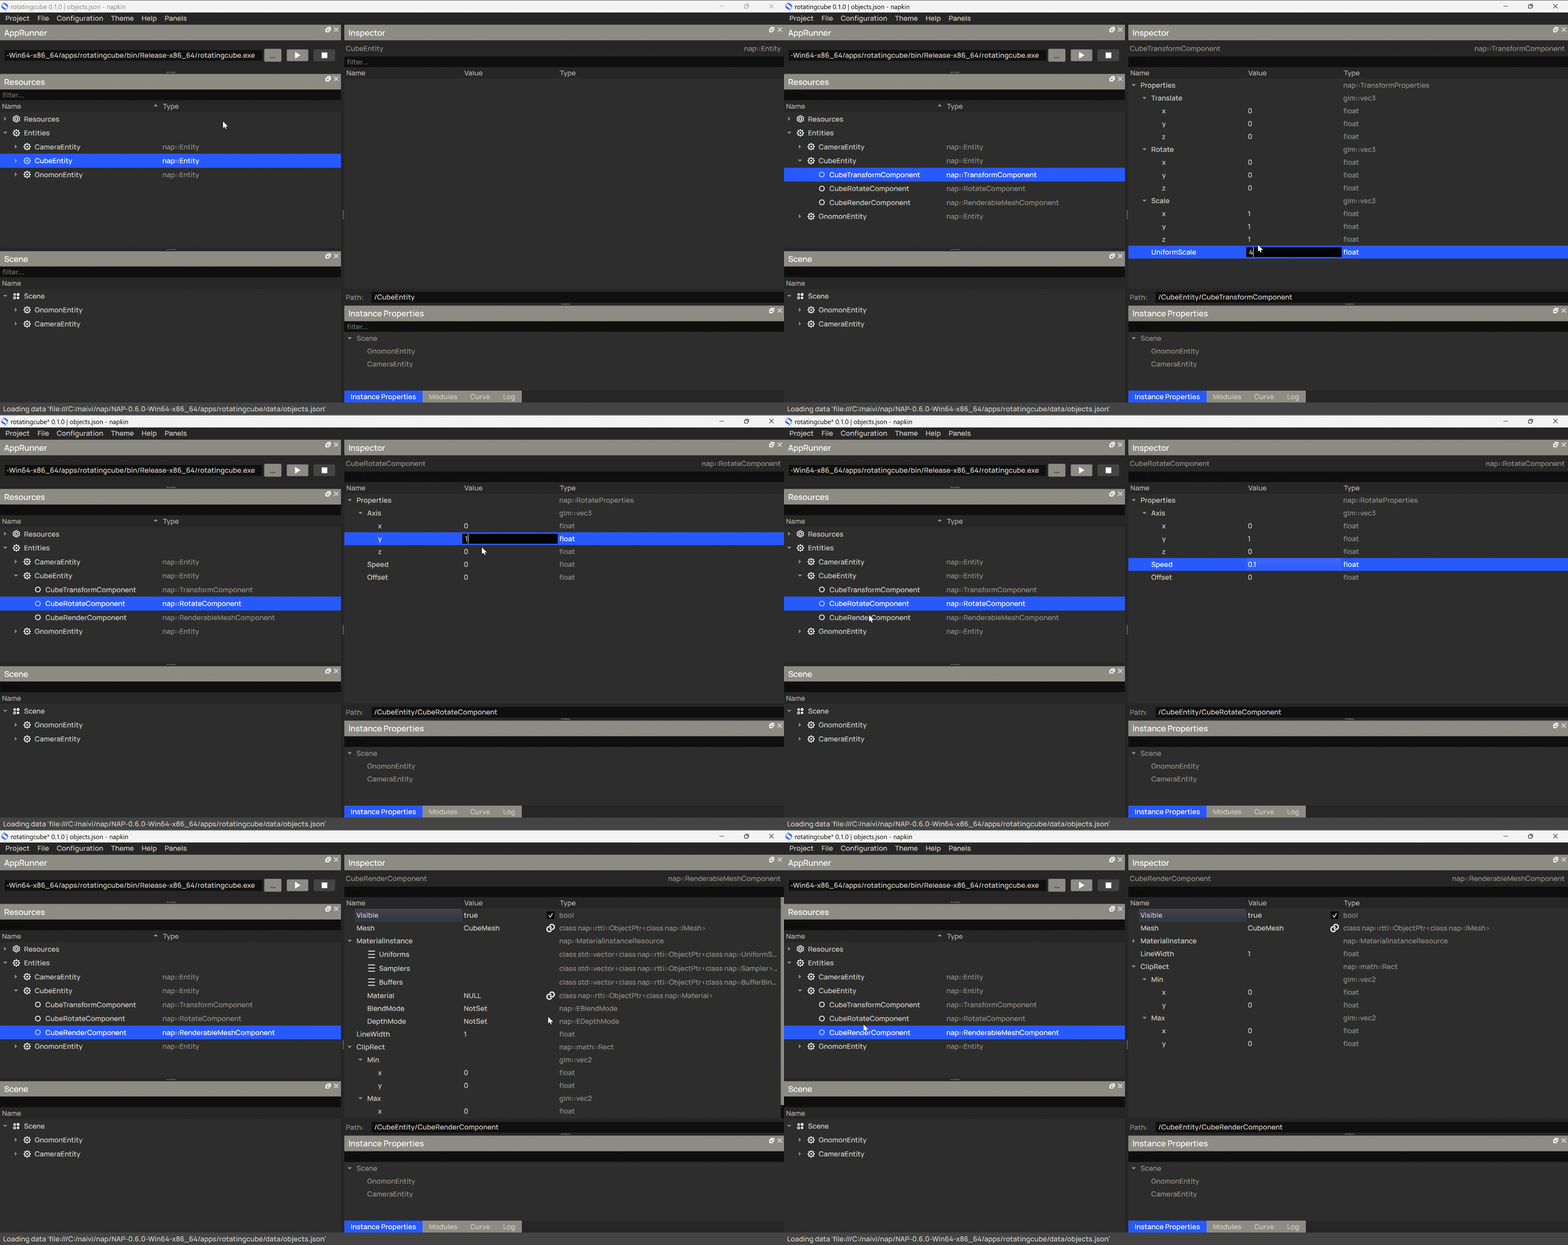
What's left on the content side is to add the entity to the scene, otherwise it is not created (instantiated) on startup.
In the scene panel:
Scene itemAdd Entity...CubeEntitySave the file File -> Save and launch the app. You should see the same window popup as before without any notable changes. That's because we did not tell the app to render the cube. NAP created and validated the cube entity and resources but has no instructions to render it. We have to add some logic to the app that instructs the system to draw it.
If at this point the application fails to initialize check the ouput of the log. You probably missed a step. If that's the case try to fix it by tracing the error message. You can look at the rotatingtexcube demo for additional guidance.
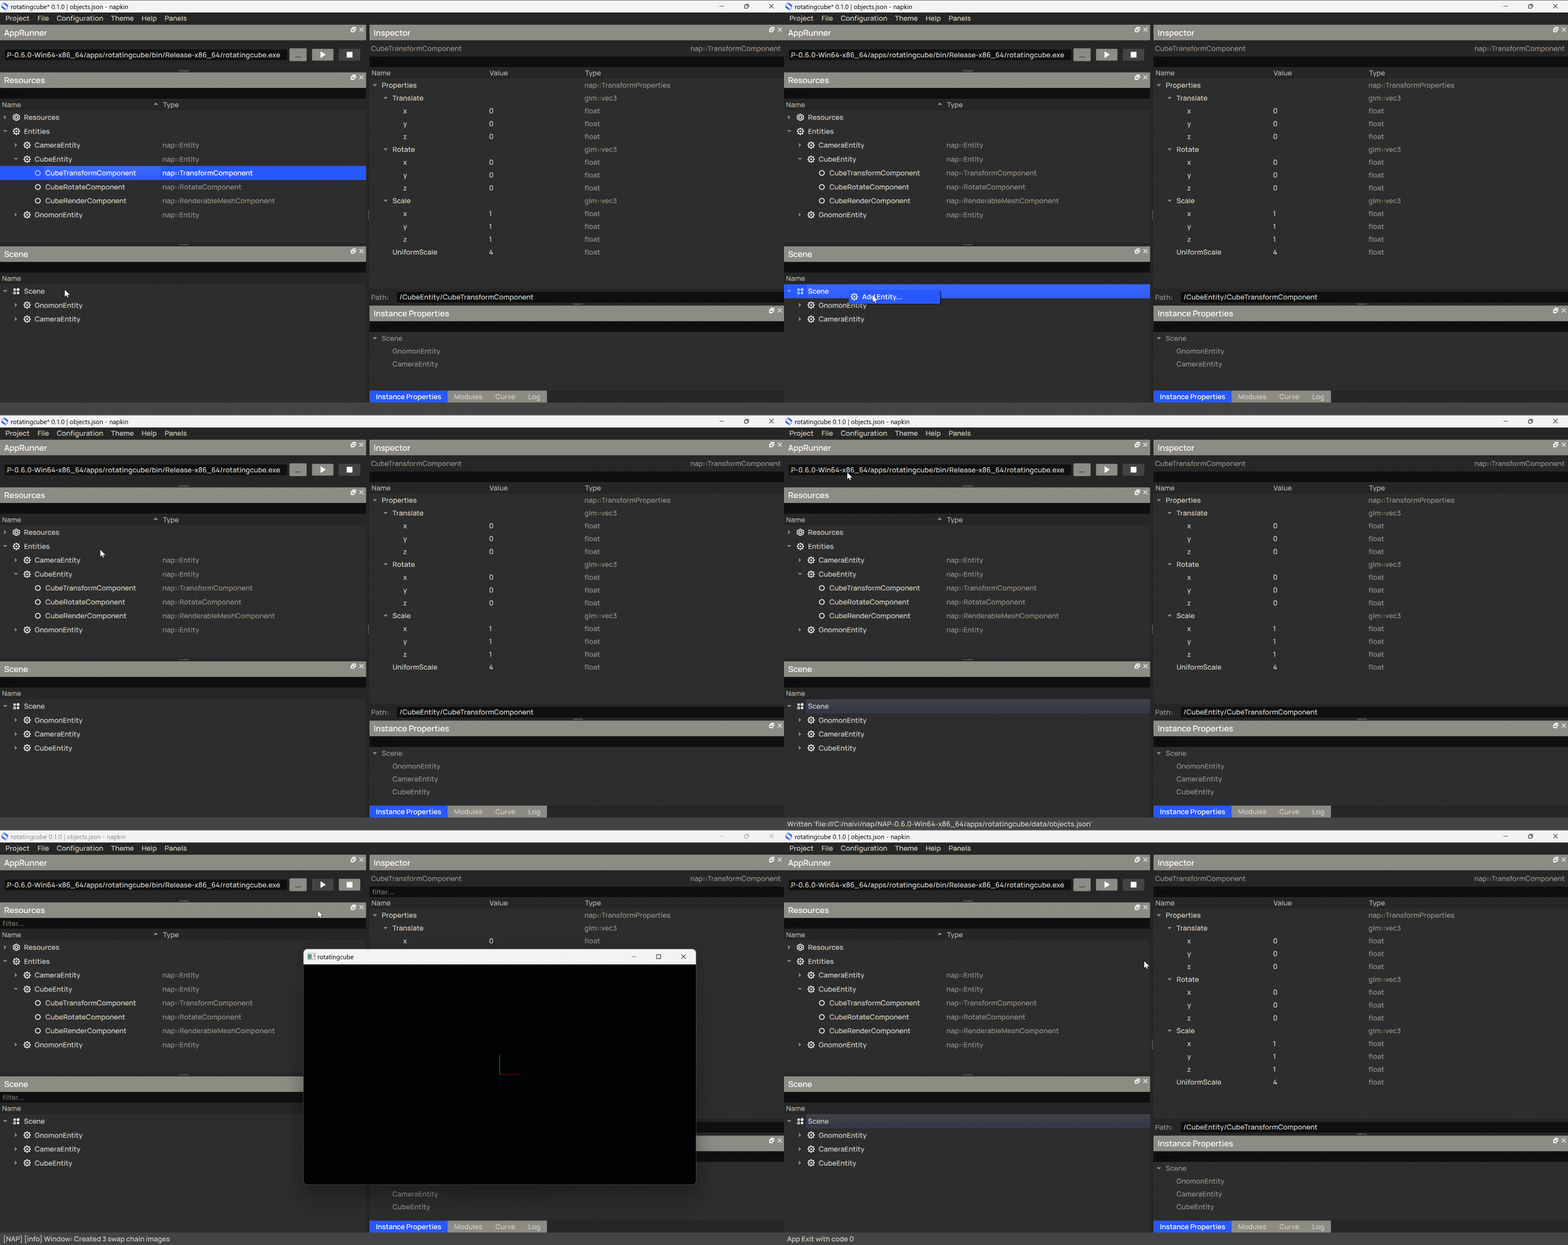
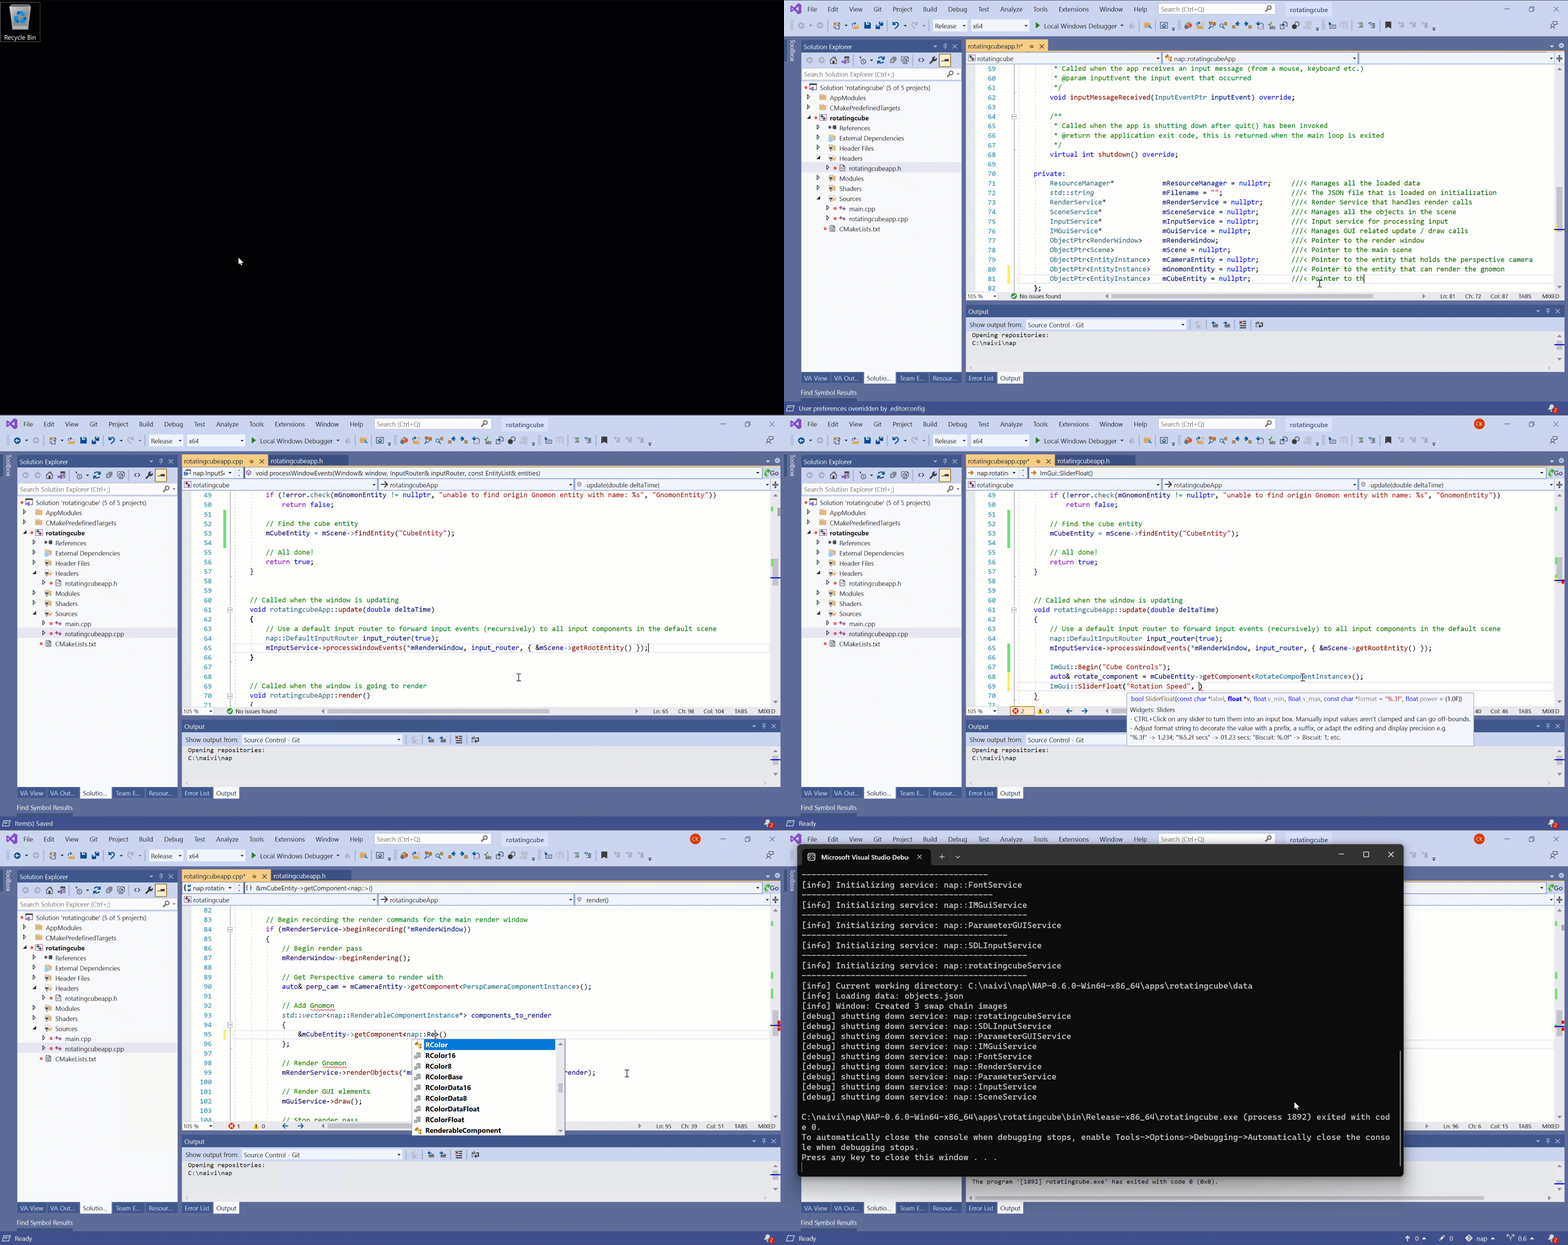
Close Napkin and open the rotatingcubeapp.h file located inside the apps/rotatingcube/src directory. This document, together with the .cpp file, contains the application runtime code. It allows you to control the flow of data and render specific objects to screen using the resources we just created.
The init method is used to initialize important parts of your application and store references to resources. For this example we need access to the CubeEntity. Add the following line of code to your application class declaration, right after mGnomonEntity in rotatingcubeapp.h:
And add the following line of code to the end of the ::init() method of your application in rotatingcubeapp.cpp:
We just created a link to the cube entity. We can use this link to manipulate the entity and it's components when the app is running.
The update method is called every frame. The parameter deltaTime indicates how many seconds have passed since the last update call. You should perform any app specific logic in here that does not concern rendering.
Let's add a slider that controls the rotation speed of the cube. Add the following include directive to rotatingcubeapp.cpp:
.. and add the following block of code to the update method, right after processWindowEvents:
render is called after update. You use this call to render geometry and UI elements to a window or render target. You have to tell the renderer what you want to render and where to render it to. We want to render our cube instead of the gnomon. To do that replace the following line:
with:
This tells the render engine to render the cube instead of the gnomon. The GUI is drawn last, on top of the rest, when mGuiService->draw() is called. To learn more about rendering with NAP take a look at our render documentation.
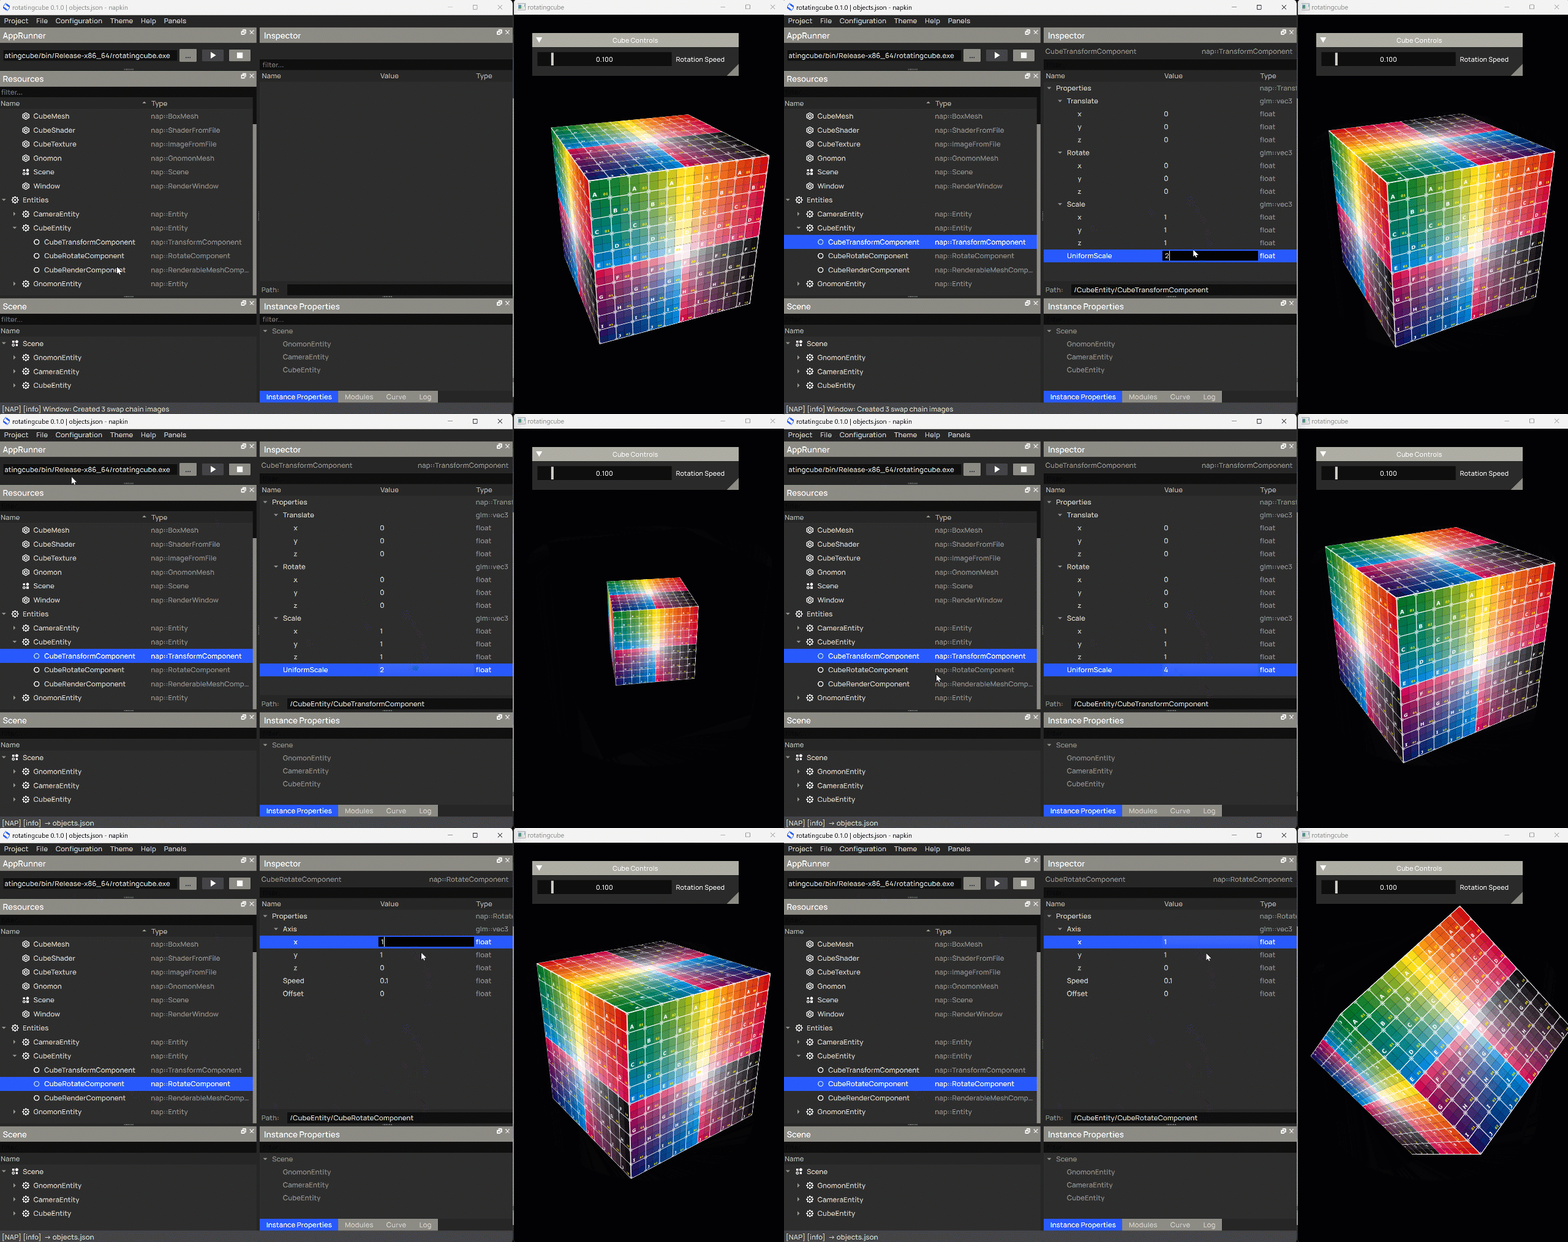
The editor and application share the same content. That content is loaded on startup of your application and monitored for changes by NAP. This means that changes you make in the editor are picked up by the running application in real-time. This system is called hot-reloading and allows you to quickly iterate on changes without having to restart the application. It is a feature we rely on heavily during development and is used by artists and designers to edit configurations on the fly. Experment with this feature by changing some settings in the editor and saving your file whilst the app is running, as demonstrated below:
Navigate to apps/rotatingcube and run:
This creates a distributable package of your application. Append --help for additional information. By default the application including Napkin and all assets is packaged for you.
Note that when working from source the package script is located in the NAP root directory.
We've covered a lot of ground in this introduction. From here it's recommended to study some of the many demos that ship with NAP and continue reading the online manual, beginning with system architecture. From there you can try and create your own resource or component. Read the project management documentation if you want to know more about modules, how to add them to your project or share them with others.