The NAP sequencer can be used to control parameters and trigger events inside a NAP application. Playback can be synchronized to audio or a different external clock. You can animate any amount of parameters while at the same time maintaining flexibility and control over synchronization.
To get a feeling of working with the sequencer check out the sequencer demo!
The sequencer is set up to run independently of the application main render thread. Because of this, the sequencer introduces some concepts that can be hard to understand at first glance. This document serves as a starting point for those who want to work with the sequencer and/or developers that want to add their own features or custom track types to the sequencer.
The following three concepts should be understood when working with the sequencer:
A fully featured NAP Sequencer is constructed from three different parts:
Responsible for loading and playing a Sequence.
Responsible for editing and saving the sequence, loaded by the player.
Responsible for drawing the sequence editor and sequence player using ImGUI.
The following JSON snippet creates a sequence player that uses an audio clock for playback. The sequence editor links to the sequence player. The sequence GUI, in turn, links to the editor:
The sequence playback logic and data format is completely seperated from the sequence editor and GUI. This means that it is possible to create an application without a window or without the render engine and still use the sequence player (for example when working in headless real-time or near real-time environments) to play back sequences. Subsequently, the sequence editor can be declared without a GUI, meaning you can perform edit calls on a sequence without a GUI attached to it, although this is less common. The sequence editor GUI is defined in a separate module called mod_sequencegui, which depends on mod_napsequence.
To ensure all (live) edits to a sequence are carried out in a thread-safe manner, all edit calls are routed through the sequence editor. The sequence editor creates sequence controllers for each available track type. Tracks can be edited by these controllers. Controllers for each available track type are created by the application at run-time during initialization of the sequence editor. All created Sequence Controllers are owned by the sequence editor.
Make sure the edit calls are performed on the same thread that is reading the sequence. For example: The GUI of the sequence editor is drawn on the main (render) thread of the application, so any edit calls to the sequence controller must be executed from the main thread as well.
In the following example we will create a custom sequence using the Sequence Player, Sequence Editor & Sequence GUI. The sequence contains one event track with a couple of events, one curve track that animates a float parameter and an audio track that plays back an audio segment. Alternatively you can skip this step and use the sequencer demo instead.
Include the following modules to make sure your project can use all the features of the sequencer:
Open module.json inside the module directory and add them to the RequiredModules field. For more information on how to add modules to your project read the getting started guide.
Next step is to create a sequence player that has a nap::SequencePlayerEventOutput, a nap::SequencePlayerCurveOutput and a nap::SequencePlayerAudioOutput. You can use Napkin to set this up for you or use the following JSON snippet as an example:
Select the window that draws the sequencer gui. Select Insert Track and then click on nap::SequenceTrackEvent. An empty event track will appear. To make sure events on the track get routed to the event output make sure to select the nap::SequencePlayerEventOutput from the inspector. To insert an event right-click somewhere in the track. A popup will appear with different types of events. In this example we will insert an event of type string. An empty string event is inserted on the track. You can move it by dragging the handler of the event or by right clicking it and change the timestamp in the appearing popup. You can also change the value of this event. Because the event holds a string we change the string event to hold a string with the value hello world. When playing back the sequence the event will be dispatched whenever the playback time of the sequencer passes the time at which the event is inserted. To receive the event or get notified attach a listener to the signal of the event output.

Select the window that draws the sequencer gui. Select Insert Track and then click on nap::SequenceTrackCurveFloat. An empty curve track will appear. To make sure the drawn curve on the track gets routed to the curve output make sure to select the nap::SequencePlayerCurveOutput from the inspector. To insert an event right-click somewhere in the track. A popup will appear asking you to insert a segment. Do so. A curve segment is inserted into the track. You can extend it by dragging the handler of the segment or by right clicking it and change the timestamp in the appearing popup. You can also change the value of this event by dragging the segment value or right click on the segment value. You can also insert point on the curve. Move the mouse cursor somewhere on the curve, right click and select Insert Point in the popup. You can also change the curve type to linear in this popup. When playing back the sequence the parameter, linked to from the curve output, will be set to the current value of the curve, evaluated at the current timestamp of the player.

Select the window that draws the sequencer gui. Select Insert Track and then click on nap::SequenceTrackAudio. An empty audio track will appear. To make sure audio is routed to the audio output select the nap::SequencePlayerAudioOutput from the inspector. To insert an audio segment right-click somewhere in the track. A popup will appear with a popup containing all available audio buffer resources. In this example we will insert an audio segment that links to an AudioFileResource, which is an audio file read from disk. To add an audio file resource to your project refer to the audio documentation. An audio segment will appear on the audio track. When the sequencer is playing the audio in the buffer of the segment will be routed to the audio output. Right clicking on the audio segment will open up a popup that enables you to edit the start time of the segment on the track, the start time within the audio buffer or end time within the audio buffer. This can also be achieved by dragging on the left or right side of the audio segment.
The top bar of the gui holds markers. Makers are a visual aid that can be used to tag a specific point of interest in your sequence. Right click somewhere inside the marker bar, a popup will appear, name the marker whatever you like and choose Insert Marker. A marker will appear. You can move the marker by dragging it inside the marker bar or edit it by right clicking on the marker.
You can rename tracks by clicking on the track title in the inspector.
You have complete control over synchronisation. The way the sequencer updates is by using a clock. You can decide what type of clock is used. It is possible to write your own clock when you need synchronisation with another already running process. For now, three types of clocks are already implemented in NAP.
The standard clock is updated on the main thread by the sequence service. This is sufficient for most use cases. The following example creates a sequence player that uses a standard clock for playback.
The independent clock launches its own thread. The thread update cycle is dependent on the given frequency. Frequency is set in update calls per second (Hz). The following example creates a sequence player that uses an independent clock for playback. The independent clock will update the sequence player 1000 times per second (1000 Hz).
The update cycle is called on the audio thread of NAPs audio engine. Amount of update calls is dependent on audio buffer size and sample rate. For example, a buffer size of 1024 and sample rate of 44100 samples means 44100 / 1024 = 43.06640625 calls per second. To increase the number of update calls per second make the buffer size smaller. The audio clock must be used when using an audio track type in the sequencer.
To change the buffer size and/or samplerate used by the audio service, see audio service configuration. The following example creates a sequence player that uses an audio clock for playback.
When the sequence player starts playback it will create an adapter for each track in the sequence. The adapter evaluates the track on update (tick) and translates the data into information to output. An assigned sequence player ouput receives this information from the adapter and forwards it to your application. Every output is a resource, embedded within the sequence player, that can be linked to within your application. Adapters are created and managed by the sequence player.
For example: Imagine a SequencePlayerEventOutput with the ID ShowControlOutput that is added to your sequence player. The mOutputID property of the event track is assigned to ShowControlOutput. When the marker hits the StartVideoPlayback event on the track during playback, the sequence player will tell the output (using an adapter) to dispatch the StartVideoPlayback message on the main thread. A handler, somewhere in your application, is interested in this event and starts video playback when StartVideoPlayback is received. A good rule of thumb here is that outputs should always be safe to link to from other parts of the application and/or from the applications main thread, while adapters are only created, used and owned by the sequence player.
The following example creates a sequence player with two outputs. An event output (discussed above) and a curve output.
The Use Main Thread property on a curve output controls if the parameter is updated on the main thread or the thread that updates the sequence player (controlled by the clock). Sequence track events are are always dispatched from the main thread.
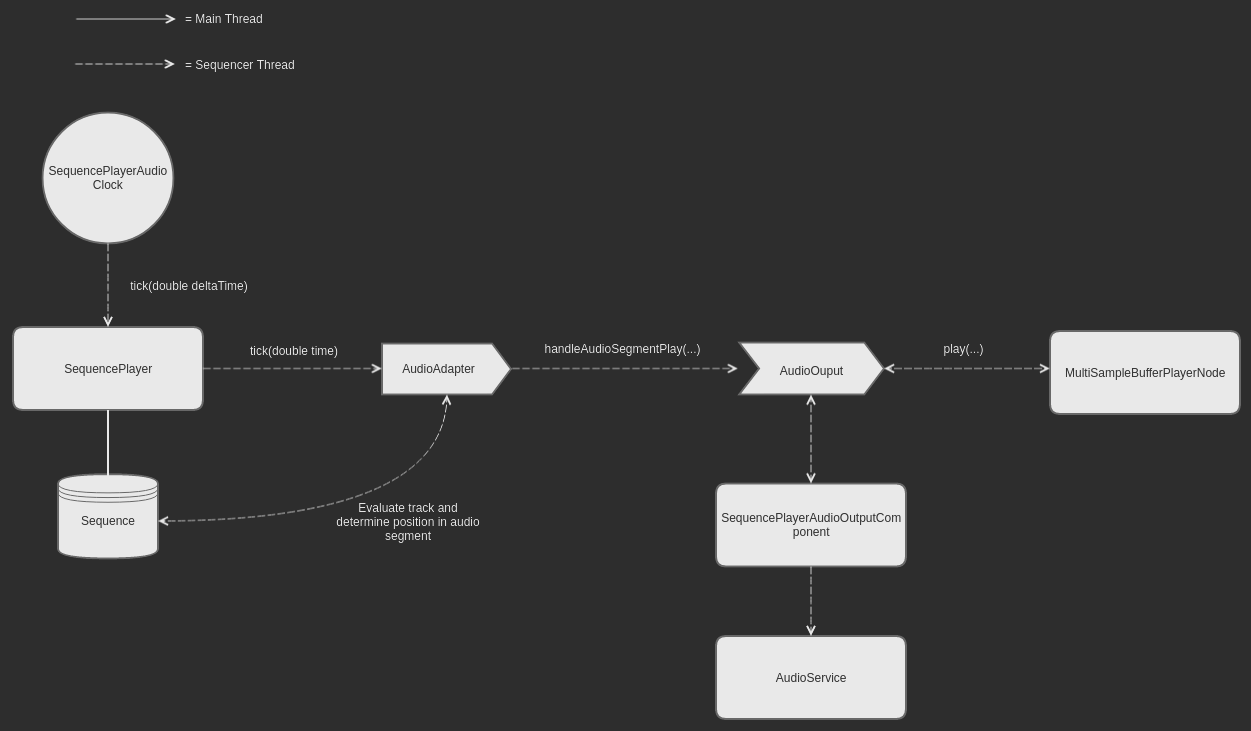
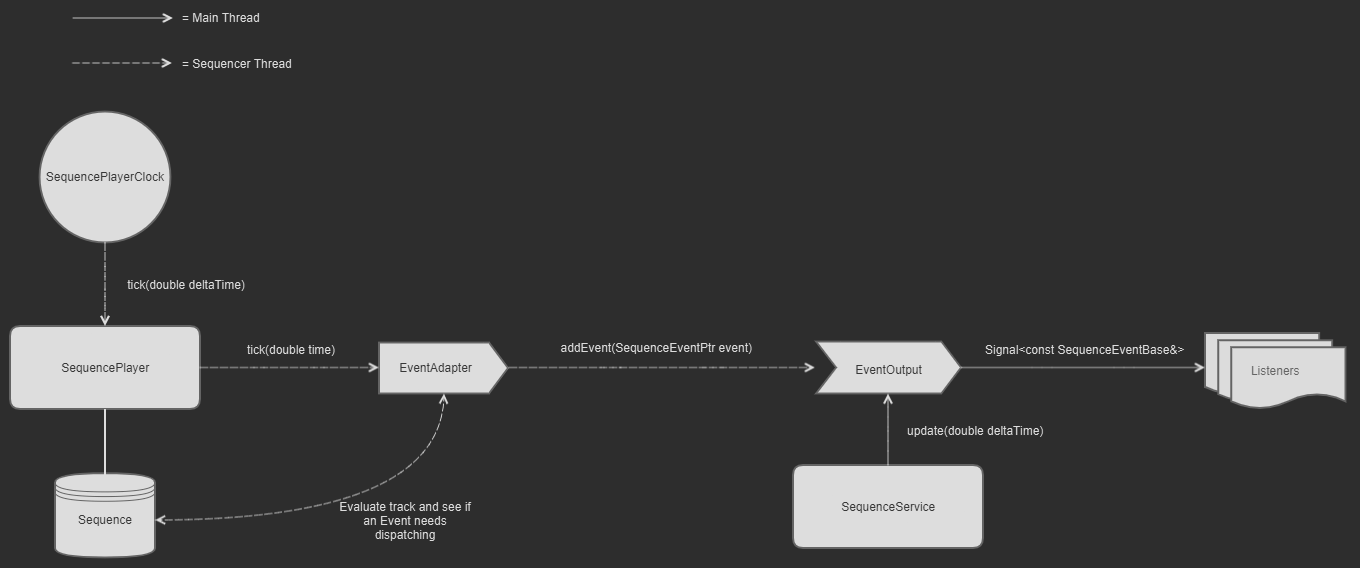
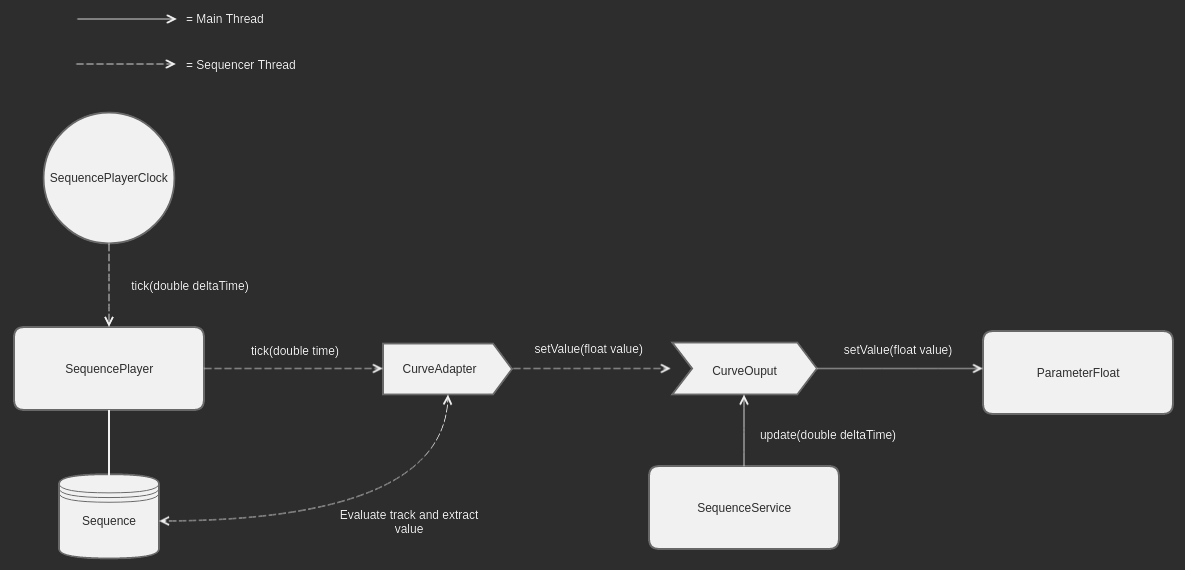
The images belows explain the relation between the sequence player, sequence adapter & sequence player output. When the sequence player receives a tick from the clock it asks all created adapters to evaluate their assigned tracks.
If an event needs to be dispatched the adapter moves the event to it's assigned output. The output update method gets called on the main thread from the sequence service. On update all queued events will be consumed and dispatched using a signal so any listeners will get notified.
When evaluating a curve track the adapter evaluates the curve track and extracts the value. It then passes the value to it's assigned output. The output then updates the linked parameter either directly when the mUseMainThread property is set to false or on the main thread if mUseMainThread is set to true. If mUseMainThread is set to true, the will be updated on the next update coming from the service.
When evaluating an audio track the audio adapter figures out the player's position in samples of the buffer that is linked to by the audio segment on the audio track, together with the playback speed (pitch). The speed & position is then set on the sequence audio output which in turns plays or stops up the correct audio node, created for each audio buffer.
The sequence player audio output component by default routes its audio to the AudioService by creating its own output nodes. To disable this and route the audio output to your own processing chain you can set its Manual Routing property to true and use getOutputForChannel or the sequence player audio output componewnt.